Posted on Leave a comment

Making Masks

Adapted from David Josef

*** TRY TO NOT USE PINS AS THIS INTRODUCES HOLES INTO INTERFACING ***

1) Cut fabric
– Cut 1 top of mask 9.5″ x 7.25″
– Cut 1 back of mask (liner) 7″ x 5″

* EVEN BETTER if you interface these pieces with non-woven medium-weight interfacing.

2) Mark center of mask front and liner pieces. Fold front mask piece in half

Clip small triangles less than the seam allowance

Do the same with one of the liners. These will help with aligning the pieces.

3) With two liner pieces, fold the long (un-clipped) edge

4) With right sides together, align the mask front with the liner, aligning the centers.  Place 2 liners, be sure the finished sides are against the right side of the top of the mask.

5) Serge around all of the outside edges

6) Press the liner into place, forming an envelope-like opening, then stitch the edges down.

7) Form the pleats, use the edge of the liner to fold the first pleat, then form 3 shallow pleats all in the same direction.

8) Press the pleats into place.  Make sure both ends are the same finished width after pleating.

9) Stitch the pleats into place on the very edge, and along the edge of the liner stitching.

10) Fold the edges towards the back of the mask to overlap the liner, and stitch into place.  Repeat for the other side.

11) Cut two 7.5″ pieces of elastic, thread it through the sides of the mask, and stitch the ends of the elastic together.  (Alternate: cut elastic slightly longer and knot ends together)

12) Rotate stitch (or knot) to the inside of the mask.


Posted on Leave a comment

2020 Sewing Bee – Round 4

I have always dreamed of traveling. In recent years, I have traveled to Scotland, Switzerland, Ireland, and did many car trips, including one to Florida, and another to Cape Breton, Nova Scotia in Canada. I toured Scotland with my daughter, who insisted I leave my suitcase home, and instead I traveled with a 30 lb backpack for 8 days. In Switzerland, I spent 10 days, hiking, doing walking tours, scrambling through a castle, hopping boats, horse-drawn wagons, and trains, and eating in fine restaurants, all requiring careful consideration of my wardrobe. My husband and I love road trips, and averaged at least one road trip a month last year. Having just completed a year packed full of travel, I learned a lot, about what I want to wear on my future adventures. Having a well tailored, comfortable, versatile, condensed, attractive wardrobe makes all the difference while traveling. As I travel more and more, I also want to find ways to pursue my obsession with sewing while on the road. I left for a road trip just two days after the round 4 challenge of the sewing bee was announced. The trip had been planned months ago, and I never thought I would make it to round 4. Never, say, never. Suddenly, I needed to pack up a streamlined sewing studio and hit the road. I formulated my plan, picked patterns, pulled fabrics from my stash, made a few purchases, and made up some quick muslins. I then cut all the garments, applied interfacings where needed, and I serged all the edges to keep the raveling to a minimum. There were a number of snags along the way, but, I adapted and overcame. I am so pleased with my outfit, but also for my successful proof of concept of sewing on the road. When my husband does eventually retire, I hope our future holds many more adventures on the road, but I worried that it would drastically cut into my sewing time. This outfit was the result of my first attempt at creating travel worthy garments using my portable, yet comprehensive sewing studio.

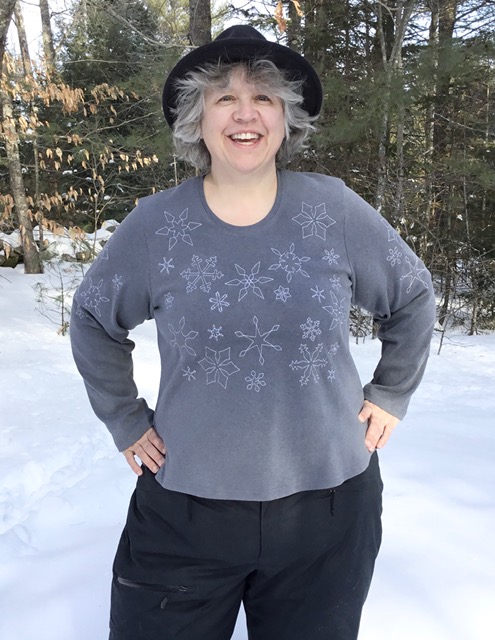
I present to you my traveling outfit. This is comprised of four pieces: a dress, a blouse, a pair of pants, and a short kimono jacket. The dress is a full length dress, with a rounded collar, tulip sleeves, inseam pockets, a button band with 17 buttons, and can easily be converted into a duster. The blouse is reversible, featuring a hi low split hem, delicate trim on neckline and armscye, and pintucking on one side. The pants are pull on linen pants with side in seam flat felled pockets, a very comfortable high waisted, wide triple elastic waistband, and cuffable pant legs for an impromptu walk on the beach. The jacket is a short reversible kimono jacket, made with denim and linen, featuring patch pockets and a bound buttonhole with back to back buttons for reversibility. This versatile comfortable attractive 4 piece ensemble can be mixed and matched for many different looks, making it perfect for traveling.

The dress is a self drafted pattern using my sloper created with the Sure Fit designs dress kit. The dress features princess seams, tulip sleeves, full length front cut on button placket, and a 3/4 circle skirt bottom. It is made with 6 yards of Robert Kaufman’s Brussels Washer Navy. The blend of linen and rayon has a lovely drape, that dances around my legs as I walk. It is long, cool, comfortable, and with an extra couple of buttons and buttonholes, it converts into a duster or long vest. This idea came to me when I found myself touring through a castle full of winding staircases in a lovely long dress. To safely navigate, I buttoned up the dress on itself, it looked strange, but it worked. This is a more attractive version, which can easily convert into several very flattering looks. I placed a button on the inside bottom of each button band. I also attached tabs with buttonholes along the back princess seams at the waistline. This allows two different levels of drape. I wanted to use flat felled seams but, this was not compatible with curvy princess seams so I devised a clean finish, that transitioned to a flat felled seam below the waist. The armscye seam allowances are bound with bias to keep it neat. The curve in collar mimics the curvy tulip sleeves. The tulip sleeves are large upper arm friendly, and add width to my narrow shoulders, balancing out my overall pear shape, and giving the impression of more of an hour glass shape. I feel absolutely fabulous in this dress.

The top is a reversible pull over top. The white side is pintucked. The neckline and armscye is trimmed with a white flat piping. The bottom is finished with a hi-lo split hem. It is made with white handkerchief weight linen, and a lightweight printed linen. It is cool, comfortable, and provides two looks with one garment. The pattern is self drafted from my sloper. It is dartless. I challenged myself to find a way to make it reversible. I had these lovely yet sheer linen, that I would not use alone, but together in reversible top was perfect. The pintucking was done on my serger, and gives the garment a little structure. The construction was tricky to figure out and was achieved in a hotel room late at night with a couple of scraps of cotton, resulting in a mini mockup. The shoulder seams are sewn on both tops. I sewed a bias strip folded in half around neckline of one top. I then layered tops right sides together, and used the first stitching as guide to stitch neckline on both shirts. The flat piping made it very easy to turn the shirt. The armscye’ s were done similarly, but the trim must not fall within seam allowances. I used burrito method the sew the arm scye’s right sides together after trim was applied. I then sewed the side seams down to the start of the split hem. I used the burrito method once again to finish the front hem. I left a gap in the back hem to allow for turning right sides out. I also cut the white side of shirt an additional half an inch longer in the front resulting in a thin white edge on the front lower hems of both shirts to coordinate with the other trim. I skipped white trim on back hem for practicality. I will repeat this pattern again, but next time I want to try using some, lovely lawn print with some handkerchief weight linen for an even lighter more fluid effect.

The pants were from a tried and true pattern. Being a short plus size pear shaped woman, makes making pants for myself a major endeavor. All pants patterns require extensive alterations to fit me comfortably while sitting, standing, and walking. I have a tilted waist and wacky crotch depth and crotch curves. Many muslins were done, and with every make I tweak and enhance the fit and finish of this pattern. I love these pants, which are as comfortable as my knit leggings, but are much more flattering. This pair of pants is made in a heavy weight linen. The seams are flat felled, with side in-seam pockets. The triple elastic waistband is wide, comfortable, and attractive. I added an additional 1/8 inch of top stitching along the very top edge of the waistband, which adds a bit of polish. I added linings to the lower legs to allow cuffing, and to provide a pop of color and coordination with other pieces in my travel wardrobe. I also eliminated the front waist pleats, and added back waist darts to my version of the pattern for a better fit. The pattern is a free PDF download from “Fabric-stores.com”, and is called the Crisp Linen Pants Pattern. The pattern accommodates sizes 0/2 to 28/30, in Letter/A4 paper. The instructions are provided via an online tutorial, with separate links for detailed instructions on several techniques such as flat-felled seams, and putting a pocket in a flat felled seam. There are no licensing restrictions as well. These pants are perfect for the impromptu walk on the beach, as well as throwing on some heels and heading to dinner.

The jacket is the Women’s Kimono Jacket sewing pattern, from Wiksten. Although the pattern only extends to XL, it is a loose boxy style, which I thought could work well for my plus size figure, with some adjustments. I chose the short jacket version, but shortened it an additional 2 inches. I shortened the sleeves an inch, as well. I also added a rounded triangle to the back of the collar piece to expand the flip down collar on the jacket, which could then conceal the collar on the dress, avoiding the double collar conundrum. I am not a fan of open jackets, so I also added a bound button hole and two back to back buttons. Being reversible, it offers two looks, in one garment. One side is a denim I purchased from Vogue fabric, several years ago. The second side is Robert Kaufman’s Brussels Washer YD denim, purchased from Pintuck & Purl, an amazing shop in North Hampton, NH. This jacket feels so lush. I typically shy away from loose boxy styles, but with a few minor adjustments, this jacket broadens out my shoulders, balances out my pear shaped figure, and draws the attention up to my face and upper body.

Round 4 started in snowy cold New Hampshire. I cut all of my garments out, and then packed up a mini sewing studio and headed south for warmer climates. Not long into the drive, I discovered I had cut the dress for a scoop neck, instead of a collared neckline. I re-cut those pieces on a king size bed in a Hampton Inn. Thank goodness for my emergency backup supply of fabric. During the 2.5 day drive, I basted seams, planned construction, started my review, and fretted about how I was going to get it all done. Once in Florida, I setup in the sunny game room, complete with a ping pong table, which worked beautifully as my sewing studio away from home. Now that the sewing is done, I am packing up the traveling sewing studio, unloading my bike, and I am heading out to catch up on some much needed sunshine, fresh air, and exercise, confident that I can bring my sewing along on my future travels, with planning and preparation.

Why should I win the sewing bee? Like my fellow contestants, I love to sew. For me sewing is the perfect combination of mathematics, engineering, and artistry. Sewing is a constant source of challenge, frustration, and provides a true sense of accomplishment. When I sew, my focus and concentration takes me to another world. Sewing for me started with quilting, which I did for nearly 20 years, and then one day I stopped. I had had enough of quilting. Soon after, my daughter needed a prom dress, so I bought a book on couture, dusted off my sewing machine, and made her a gorgeous gown, in satin, with boning, and tulle. It took several months, and for my first muslin, I used actual muslin, which makes me laugh today. After the prom dress, I decided I would like to make myself a vest. How hard could that be? I bought a pattern, measured, sewed, and it looked beautiful until I put it on. It was even worse, when I sat down. Adjustments were needed. I bought a book on plus sizing fitting, and my next vest worked up much better. There are no magic patterns that work for me out of the envelope. I have studied and learned how to alter patterns for my plus size body. The next hurdle was to learn how to choose a fabric, and consider drape, durability, as well as visual impact. In the early days, there were too stiff skirts, unintended see thru tops, unfortunate pattern placements, and casualties that did not survive the washing machine. After all that, I was starting to make some really nice garments, but I found they did not always flatter my figure. So I then studied my proportions, and my shape, and how to pick patterns, fabrics, and styles that would balance out my figure. Suddenly, the success rate of my garment making soared. Today, I live in made by me clothes. I love making for me and friends and family. I love sharing my love of sewing. I would love to be able to go back to my curvy plus size online communities and say, I won the sewing bee, making and modeling my own perfectly plus garments. I think it would inspire a lot of others to navigate the labyrinth and come out the other side, to a place where you can make one of a kind garments, that make you feel absolutely fabulous.

Finally, a huge thank you to the Pattern Review team, and the guest judges. I appreciate the time of effort that went into making this event a reality. It has been a real game changer for me. Also, none of this would have been possible without my amazing husband who made countless meals, rubbed sore shoulders, hauled sewing machines and totes full of fabric and sewing supplies, and took the most wonderful photos.


Posted on Leave a comment

2020 Sewing Bee Round 3 – Activewear

My outfit was made for bicycling. About five years ago on Mother’s Day weekend, I injured my knee. Actually, my knee without warning simply disintegrated a bit. I had been very active, loving hiking and kayaking in the summer, and skiing and snowshoeing in the winter. Several times a day I walked my two German Shepherds. I sat with my knee elevated and covered in ice packs, staring at my brand new hiking poles that I had just received for Mother’s Day and cried. After consulting with doctors I was given three options: surgery, drug treatment, or physical therapy. I choose physical therapy. My therapist and I together got me moving again. As part of my recovery plan, my therapist suggested bicycling. I scoffed at the idea at first. But, after a couple of timid attempts I was hooked. I fell in love with bicycling. How many times do you find something that is both good and good for you!

Being a short plus size woman, I can tell you my options for ready to wear (RTW) active wear were non existent. I did a lot of “man-me-downs”, men’s RTW clothing adjusted to fit me. For some reason men’s RTW active wear, was available in much better quality fabrics and a wider size range. Still I felt a bit frumpy in my cobbled together biking outfits. When biking 20+ miles a day, seam placement is critical. My husband and I bike as much as we can. A trail literally crosses over our driveway and is a mere 4 miles into our home town, which is a lovely summer resort town on a lake. I run into lots of folks I know, and often in summer, I can bicycle into town much faster than I could drive. I love to visit the shops and meet friends at the cafes. But, I did not relish the idea of walking around town in my bicycling outfit. So my goal for this challenge was to create a more chic bicycling outfit, one that would transition from biking to shopping.

My outfit has five elements. The main bicycling half zip shirt is color blocked with synthetic knits. The pants are wide leg leggings with a yoga style waist band, which have zips on the back of the legs converting them into bicycle friendly pants. I made a quick camisole as an added layer for under my shirt. I then made a vest which can be packed into my bike bag, and provides a much needed pocket for when I am off the bike. To top it off I found a sweet sheer remnant and I made a scarf to complement the look. This comfortable flattering outfit will let me bike into town without looking like I just biked into town.

The bicycling shirt is from the Jalie pattern 2682 – Women’s Top. It has a different neckline with a cut on collar, which is high in the back, and has a flattering v in the front. It requires four way 40% stretch, and has an optional front center zipper. Minimal seams around the neck, make this an excellent choice for biking. I have shorter than average shoulders, and with the cut on collar, the shoulder adjustments were tricky, but definitely doable. I also widened the waist and hip area a bit, and shortened the arms. The pattern offers so many possibilities for color blocking which I find very flattering. I love the look, and I will be making more of both the sleeveless and long sleeve versions, as soon as I can get my hands on some of the gorgeous active wear technical knits available today.

Click Here For my review of Jalie Pattern 2682

The pants were from Apostrophe Pattern’s MyFit leggings. You buy access to a program that generates a pattern according to the measurements you provide, the percentage of stretch in your knit, and the style options you choose. For this project, I chose the wide leg seamless version, with a yoga style waist band. The first pair fit well, definitely wearable, but for my final version, I added one inch to back upper thigh area, and I lowered the back waist an inch. Minor tweaks but they definitely smoothed the finished look a bit. These result in amazingly comfortable pants, with a snug high waist band, and flattering wide legs with no outer seams. I sewed some “Fantastic Elastic” into top of the waist band for added snug fit. I used the technique I found in the book, “Knits for Real People” by Susan Neall and Pati Palmer. I hate the look of my legs in tight leggings, but I love leggings. I only wear tight leggings out of the house when biking. While much more flattering wide leg pants on a bike could be troublesome. I do not want my pant legs to get caught in the gears, so I added a v shaped zippered gusset on the bottom backside of the wide leg. This allows me to bend over and zip and unzip the pant legs easily. No more searching for a changing room, and lugging a second outfit. I can convert the pants from biking to normal pants easily. When zipped the excess leg material is kept loosely to the back of my calf, which is comfortable when pedaling. The high waistband is excellent for also maintaining modesty when bicycling. I highly recommend Apostrophe Pattern’s MyFit leggings, I had made many options previously and the success rate is quite high. The key is getting your measurements right, and understanding and using stretch knits.

Click Here For my review of Apostrophe Pattern’s MyFit Leggings including my zippered gusset hack.

My third item is a linen vest. I wanted something to jazz up the outfit once I am in town. I chose to make a light lined linen vest. The vest has a side in-seam zippered pocket, which can not only hold my cell phone and a few essentials, but also contains an attached bag to allow me to stow the vest in before packing it into my bicycle pack, keeping it neat and tidy. The pattern is self drafted using my sloper from Sure Fit Designs system. I added a couple of welt pockets and some rouleau button loops, and my signature shoulder straps. This took the “biking” out of my outfit and added some polish.

I added a couple of other items to round out the outfit. I really liked the long front zipper on my shirt, which allows ventilation, but I decided a camisole would allow me to unzip and still maintain modesty. The camisole is a SUAT – Stitch Upon A Time’s Versa Cami pattern. I used fold over black elastic for straps. Layers are great on long bike trips and this used up the rest of my black knit. Win, win, win! I had all the knit fabric in my stash except one. Can you guess which one I bought for this project? The snakeskin print knit. I fell in love with the colorway and the texture, before noticing it was snakeskin. Not my first choice but due to time constraints I settled for this locally available knit fabric. While shopping for that knit, I also found a small remnant of sheer fabric, which screamed scarf. For the scarf I used my serger, and did a rolled edge, using water soluble stabilizer and wooly nylon in looper for better results.

This resulted in a polished looking outfit for romping around town in, which I can easily convert into a comfortable bicycle ready outfit for the 4 mile trip home. I will be making all of these items again, especially after I get some more pretty technical fabrics, that not only stretch but breathe, and wick moisture. I cannot wait! But wait I will have to do, as you can see it is not quite biking season here. 33 days until spring. It was a sunny 16 degree (Fahrenheit) day, while taking the photos. I took my hat off for most photos, but there is one included for fans of my favorite hat. Thanks to my dearest for his support and photography help, and to all for looking and sharing.

Posted on Leave a comment

2020 Sewing Bee Round 2 – Pockets!

Round two!


This is my second Seamwork Audrey denim jacket. I adored the first one, but I longed for a second version, a bit lighter, with some fine fit tuning, and of course, more pockets. The first jacket was done in a heavy denim and had a shocking lack of pockets, which only became apparent after the first few outings. The pockets theme of this contest jump-started my project: Seamwork Audrey Jacket – Round 2.

I love the design lines of the Audrey. It features two generous welt pockets, which fall out of sight on the side of jacket, and can hold quite a bit. But, that was the only outside pocket provided. An informal pocket was formed on the inside of the jacket, by the welt pocket bag itself. There were two pocket flaps on the chest but no pockets beneath. While wearing the jacket I found that getting things in and out of the welt pocket was slightly awkward, especially my cell phone, which went to voice mail often before I could fish it out.

So for round two, I decided to add pockets underneath those pocket flaps. But, I wanted to honor the flattering slanted seam lines in the center front jacket. The area between those lines would not accommodate my cell phone. The solution was to make those pockets, bellow or gusset pockets, which needed to be trapezoidal instead of rectangular in order to follow the current seam lines. Next, I wanted a sealed or zippered pocket, for my emergency cash, my id, my credit card, and my keys. I did not want to worry about these falling out of the pockets. A small zippered pocket was added to the upper left sleeve, which was easy to access with my right hand. I kept the original welt pockets as they are perfect for slipping your hands into while walking on a brisk day, and holding a pair of gloves. I polished up the internal pocket by adding edging on to the internal welt pocket bag. This jacket would now have four different sets of pockets making it perfect for dashing out the door.

Two other changes were made. I add two shoulder straps. I have relatively short sloping shoulders. The shoulder straps added some visual height to my shoulders as well as providing a place to hook my purse’s shoulder strap on. No more purse slipping off my shoulder while shopping. With traditional sewn denim buttonholes white whisker threads would start to appear with wear. This is a real pet peeve of mine. I changed all THIRTEEN buttonholes into tiny double welt or bound buttonholes. This required some careful consideration during construction, as the front of the buttonholes were added prior to assembly, and then back of buttonholes were opened up after assembly. The welt pocket bag had to be altered as to not fall underneath several of the front buttonholes.

This jacket has 16 welts on it, 13 double welt buttonholes, a zippered welt pocket, and two single welt pockets. For each welt, I traced my welts on to the wrong side of fabric, and on to wrong side of interfaced welt fabric. I then hand basted stitches into the four corners of both welts. I would leave two tails, and then I would gently pull on both tails, causing the upper and lower welts to align perfectly every time. After the garment was assembled I carefully cut out the welt, in each buttonhole on the double Y’s, and used reverse hand applique, to finish off the back of the buttonholes. Time consuming but the results were worth it.

I chose a medium weight dark denim, with a tiny woven polka dot like flower pattern, which I have had in my stash for a couple of years. For top stitching I used a medium gray Aurafil 28wt cotton thread with 90 jeans needle. Finding 13 matching buttons was a challenge, as our local stores only offer a small selection of buttons, and rarely stock more than a dozen of each type. I started with my last drafted pattern version of Seamwork’s Audrey, but, shortened the sleeves, and brought the waist in by approximately four inches. The original pattern version had the following alterations: shortened the shoulder seam, added 4” to upper sleeve width, and graded, from 20 bust to 22 waist. I enjoyed following along with the online class video, in addition to their excellent written instructions.

I am incredibly happy with the outcome. This is exactly the jacket I had been visualizing in my head after my first Audrey denim jacket. The bound buttonholes were time consuming but I love the clean finished look. Drafting and sewing the trapezoidal gusset pocket took some experimentation but it fits my cell phone perfectly, providing quick access, so no more missed calls. I agonized over the drafting and placement of the shoulder straps, especially in relation to the dropped shoulder seams. Denim brings its own sets of challenges. I highly recommend jeans needles, and straight stitch plates. The top stitching was nerve wracking as I chose a high contrast between the thread and denim. Lots of practice on top stitching and welt making went on.

A couple of notes for next time: the side seams and underarms are sewn and then the edges of the seam allowances are finished separately. I would have finished the edges prior to sewing. The inside is tidy, and I understand the practicality for faux flat felled seams in denim, but I might be tempted to try real flat felled seams for making the inside as pretty as the outside. Of course, I would not recommend completing my next version in just under a week. I definitely recommend this pattern.

Posted on 2 Comments

2020 Sewing Bee – Have you got what it takes?

So… I absolutely love the Great British Sewing Bee. I fantasize about being a participant, always cool and calm under pressure. Well, the closest I got so far, is my very first entry into PatternReview.com’s  2020 Sewing Bee. In the Great British Sewing Bee, contestants have hours to complete a project. In the Pattern Review Sewing Bee, I had a week, to complete a collarless knit tee shirt with some connection to childhood. Easy, right? Well, not so easy. Of course, I waited a couple of days to even begin. Then, I decided to make a dart-less tee shirt, embellished with embroidery. I wanted to use my own original embroidery designs.  I already had a self drafted tunic pattern pattern with 3/4 length sleeves, which I had made several times in lighter weight knits. Some minor adjustments and I was golden. I also happened to have the  perfect fabric: an almost full bolt of gray medium to heavy weight knit.

2020 Sewing Bee - Round 1

So… step one, coming up with a design concept. The contest was taking place during the coldest and snowiest part of the year for me. I found myself, grumbling about the snow plowing, the snow shoveling, the icy paths, and frigid walks with my dog. To me a tee shirt is light and cool, worn in the summer, or possibly buried under layers for added warmth in the winter. Not exactly an opportunity to showcase my talent. I was thinking of my childhood, and spotted the neighbors out with their little one, pulling her along in her  sled, and it brought back a flood of childhood memories. I always loved winter, and snow. I loved skating, sledding, building snow forts, snowshoeing, and skiing. As a child, I loved that snowfall changed the landscape for me. Trees that were once too tall were now accessible, thanks to the new snow banks. Can you tell I was, well, still am a tom boy? I had my theme, snow.

Next, I decided to dust off my laptop and open up my design software and bang out a couple dozen snowflake designs. Easy, right? Well, not so easy. Of course, I installed my latest update, only to find that my laptop was not up to the task. Each step of the design took my poor old laptop forever. I spent a great deal of time watching the spinning ball, and wondering if I could muster enough patience to get through it. I managed to come up with 8 designs before I had reached the end of my patience. Excitedly, I grabbed my fabric, my tear away stabilizer, and powered up my new sewing machine. Yes, I had traded in my old sewing machine with embroidery capability, for a brand spanking new one. This would be my first time embroidering my new machine. Oh, and I had never embroidered on a knit fabric, only woven fabrics. So here are a few things I learned along the way. Remember to use ball point jersey needles on stretchy knits. Tear away is not appropriate for knit fabrics, use a cut away instead. And yes, cut away adds an extra time consuming step of having to trim away the excess while being careful not cut a hole in your beautifully embroidered fabric. When importing designs the stitch density must be considered and appropriate for your fabric and the stabilizer. Shrinking one of my original designs down too far, led to my first catastrophe, a knotted nest of thread under my stitch plate and a hole in my fabric. After clearing that mess, I started fresh, only to find my new machine throwing occasional top loops. Changing needles, re-threading, adjusting top tension did not improve things. I adjusted the bobbin tension on the bobbin case, but things went from bad to worse. It was the evening on a holiday weekend, and the embroidery was halted due to lack of dealer accessibility. When the dealer opened, I was there to pepper the staff with questions, and ended up purchasing a new bobbin case designed specifically for embroidery, and a multitude a stabilizers meant for use on knits. I cannot thank “little” Donna from Quilted Threads in Henniker, New Hampshire for all her help. Stop by this amazing shop if you are ever in the area, it is not to be missed. Equipped with proper materials, and some knowledge I forged on. Using my design software, I created a second set of my eight original designs only much smaller. This adjusted the stitch density accordingly and no more thread nests! It is recommended that a design be enlarged or reduced by no more than 20%. Also, my entire design was done in the same thread, so color changes were not necessary, but I did find it a good practice to occasionally re-thread the top thread anyway. Be sure to trim the starting tail, because if it is too long it will snag the design. I got through a perfect practice piece. I was ready to move on.

I washed and dried a 5 yard piece of a gorgeous gray medium to heavy weight knit, which I found on sale during a trip earlier this year to Fabric Mart, in Sinking Springs, Pennsylvania, another not to be missed spot . I am plus sized, but this knit was very wide, so I could make a long sleeve tee shirt with just 2 yards of it. It was a dream to mark, cut, embroider, and sew. Thank you sewing goddess for blessing me with this fabric, and a shout out to my husband who urged me to buy almost an entire bolt of it. I modified a pattern I had drafted for myself for a tunic with 3/4 length sleeves intended for lighter weight knit. I had made several of these successfully, resulting in a couple of my wardrobe favorites. I cut four rectangular over sized pieces each with the front, back and two sleeves marked on them. I hooped them up and embroidered the fabric, taking the placement into careful consideration. Being a pear shaped woman, I have learned that it is best to create interest that draws the eyes up to the face and chest area, and away from the waist and hips, so that resulted in the embroidery being only on the upper part of the garment. Maintain a good distance between edges in case adjustments are needed. I also used a tack for marking the bust apex, to avoid placing a snowflake on an apex, creating an unfortunate bulls eye effect.  I then embroidered the four pieces. While one was being embroidered, I used the time to carefully trim away the excess. I highly recommend slowing down your machine during embroidering. It really improves the results and reduces drama. I did have a few false starts, but I stopped and picked out stitches and started again. The fabric recovered beautifully. Trimming the stabilizer took a long time, and was very stressful, but I managed to get through it.

I contemplated just cutting out my pieces and sewing them up, but my sewing sense was nagging me. So, I cut a second top out of the extra fabric. I threaded my serger and cover stitch machines with the proper color threads and did some test runs. I sewed up the stunt double with no problems at all. I slipped it on, only to find that the thicker knit, had changed the drape of the garment. My shoulder seam was almost a full inch too far back, and there was noticeable wrinkles near the under arm  portion of the arm scye. Made adjustments to my pattern pieces by moving the shoulder seam, carving out a bit more of the arm scye, and deciding on the proper tee shirt and sleeve lengths. I retraced the new pattern pieces over the embroidered material. This is where leaving room near the seams is important so you have room to maneuver.  I cut the four pieces out and was ready  to sew.

Construction is straightforward. I serged the shoulder seams. I reinforce shoulder seams on tee shirts typically, but I could have skipped it with the thicker knit, I think. Next, I serged the sleeves on to each side. Some stretching was needed to make it align, but I find using little clips to place the seams, before moving to the serger, very helpful. The under arm and side seam were serged. I baste or thread tack the seam allowances into place before serging to insure proper placement during sewing, and avoid having pins anywhere near my serger blade. I also must stress the importance of pressing seams after each seam is sewn. It really does improve the overall look of the finished product. I flipped and ironed the bottom hem and cuffs, and then used my cover stitch machine to top stitch. Where seams meet, I cut a tiny bit into seam allowance by the fold, then flip seam allowances in opposite sides, this reduces the bulk. I use thread tacks to hold in place, and press it one more time. This preparation made the top stitching very smooth. My cover stitch machine comes with a clear curve foot, which is perfect for top stitching those tight curved areas. The final step was the neckband. I measured the neckline seam allowance, and reduced it by 20%. I cut a 1.5 inch bias binding strip from my knit, and sewed a mitered joint to give me the proper length band. The mitered join again reduces bulk. I pressed the neckband in half, with wrong sides together. I then used pins to mark four quarters of band starting with a pin near the join. I used 4 more pins to mark the four quarters of the garment neckline. This is done first by matching shoulder seams, then folding front and back, resulting in front and back centers on folds. Then match the front and back pins and find the two side centers, which do not necessarily fall on the shoulder seams. Making sure the join is in the back, I then matched up pins, and started clipping the stretched neck band to the garment, right sides together. I used my sewing machine set to knit stitch, and sewed the stretched neckband onto the garment with scant 1/4 inch seam. I pressed the neckband up. Pressing is important, once I was happy with the neckband, I used my cover stitch machine to top stitch. A clear foot, and going slowly, resulted in some fine looking top stitching around my neckband. One final press of the over all garment and I had a fine looking tee shirt.

I thought the hard part was over. But, then there was the photography. My incredibly understanding supportive husband snapped many photos, and listened patiently as I stressed over shadows and wrinkles. We had a good set of photos and called it a night. But the next morning we woke up to amazing sunshine, and we ended up taking another whole set photos during a morning walk with the dog, which was more fun and natural. The second set of photos were a huge improvement over the stiff posed shots taken the night before inside. Another lesson learned. Of course, that was not the final step. I had to create and publish a review of the project, and then officially enter it into the contest for judging. I will get the results in five days. Till then I will start cleaning the disaster area that was formerly my sewing room. I will also get reacquainted my husband and dog, my spin bike, and my kitchen. Because they were all ignored for the duration. My hat is off to anyone that participated on the Great British Sewing Bee. Perhaps it is a kindness that the challenges last only hours instead of days. I learned so much during this endeavor, and most of it had little to do with sewing.

Lessons learned:

  1. Make what you love. Make what will be worn. Do not compromise.
  2. Embroidery on knit, requires cut away stabilizer, jersey needles, practice, patience, and more practice and much more patience.
  3. Photography is a whole other art form.
  4. Writing a review is yet another whole other art form.
  5. A project will consume all the time available until the deadline.

My parting shot: I look pretty good even while I am wearing my puffy snow pants. Fingers crossed I make it to round two.